Introduction
It is always easier to change payroll software at the beginning of the year, before any payments are processed. However, it is still possible to change mid-year.
There are two ways to transfer data depending on how far into the year you are, how many employees there are and the payment frequency.
Step one: Calculate the number of payments. You can do this by multiplying the number of employees by the payment frequency and how far into the year we are. For example, if it is March, with 5 monthly paid employees, then there are 5 x 3 (months to march) = 15 payments.
Step two: Depending the on the number of payments and how difficult they are to replicate, decide on whether you wish to enter year to date figures or re-process the payments in Cloudpay.
We would recommend re-processing the payments if at all possible. This way you have the benefit of a 'parallel run' so you can be confident that Cloudpay is returning the same values as your old payroll software. You will also have all the payslips available.
If there are too many payments to re-process or the payments are complex, you can enter year to date figures instead following these instructions.
Old payslip figures
Refer to the last payslips produced from your previous payroll software. You will be entering these into Cloudpay.
Note that the important figures have had letters assigned to them.
In this example, the employee was weekly paid, and the payslip cumulative figures are for all payments up to and including week 19. This is important!

Previous Employment Figures
Once you have set up the employees and retrieved their RPNs, the next step is to enter year to date figures. In the employee screen there is a YTD (Year to Date) button. Select the employee you wish to enter the uear to date figures for and click the YTD button
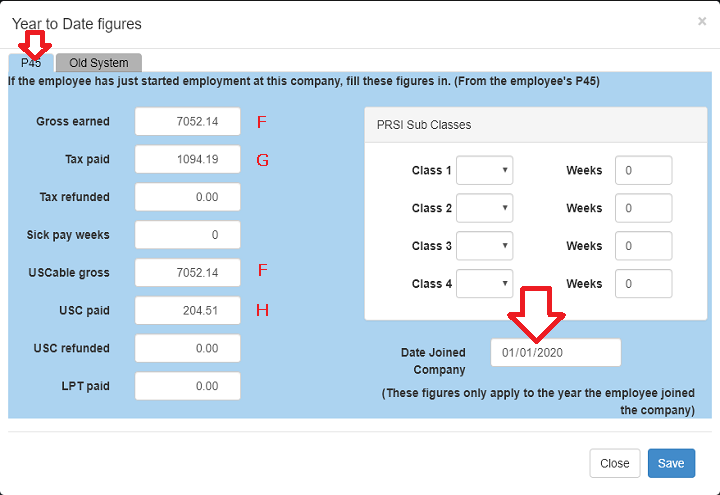
If there were figures entered in the Last Employment section of the Thesaurus payslip enter these as shown, in the P45 tab of the year to date screen.
You will also have to enter a date in the date joined company box. If you do not know the date, then enter 1 January of the current year.
Old payroll system figures
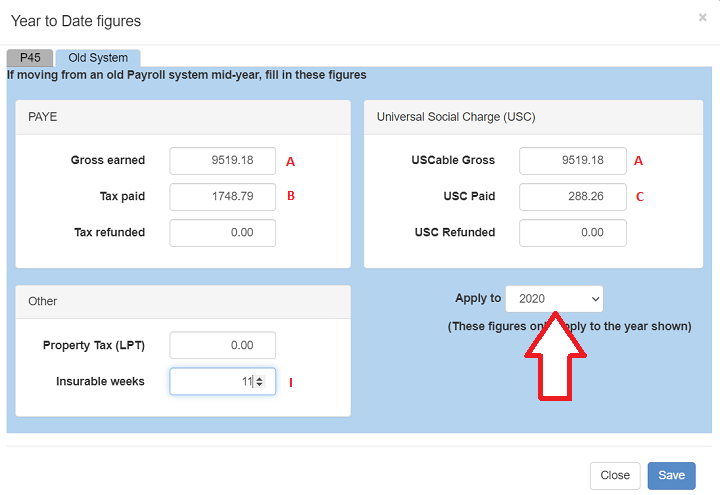
Repeat the same process for the Old Payroll system figures.
Pay particular attention that the Apply to Year drop down (see arrow opposite) is showing the current year
The first week you should pay using Cloudpay
It is important to select the correct first week to process in Cloudpay.
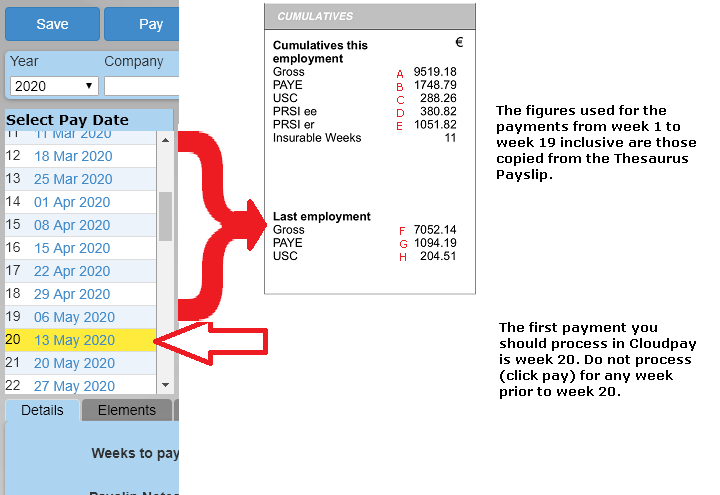
In this example, where the cumulative figures up to and including week 19 were used, the first week you should process in Cloudpay is the next week, ie week 20.
If you were to process week 19, then in effect week 19 will have been processed 'twice' - once using the thesaurus figures, and again in Cloudpay.
If week 21 were to be processed, then week 20 will have been 'skipped'.
In summary, process the next period in Cloudpay after the last Thesaurus payslip.
Important Notes
In the above example, the cumulative figures were for up to and including week 19.
This means in this example the first period you should process in Cloudpay is week 20. If you process any other week, the figures will not be correct.
This is all because of the way the PAYE system works. It is all cumulative and relies on previous weeks' figures.
You'll have to enter year to date figures for all the employees. A payment isn't processed in Cloudpay until you click Pay and payments should be processed in date order.
The good news is that you only need to enter year to date figures once for each employee. After that, processing payments will be much easier.